
Bài 3: Nhiều điểm dừng
Trong Bài 2, bạn đã học cách tìm điểm dừng để lập trình đường đi có kiểm soát cho Cánh tay rô-bốt 6 trục để tránh chướng ngại vật. Trong bài học này, bạn sẽ thực hành tìm điểm dừng để tránh nhiều chướng ngại vật. Vào cuối Bài học này, bạn sẽ sử dụng các điểm dừng đã tìm thấy để lập trình cho Cánh tay 6 trục nhằm di chuyển và vẽ đường đi giữa các chướng ngại vật.

Nhiều điểm dừng
Trong nhiều tình huống và bối cảnh công nghiệp, cánh tay robot sẽ cần phải di chuyển và vượt qua nhiều chướng ngại vật. Bạn có thể sử dụng các chiến lược đã học trước đó để tìm các điểm dừng này. Để thực hành, hãy làm theo các bước sau.
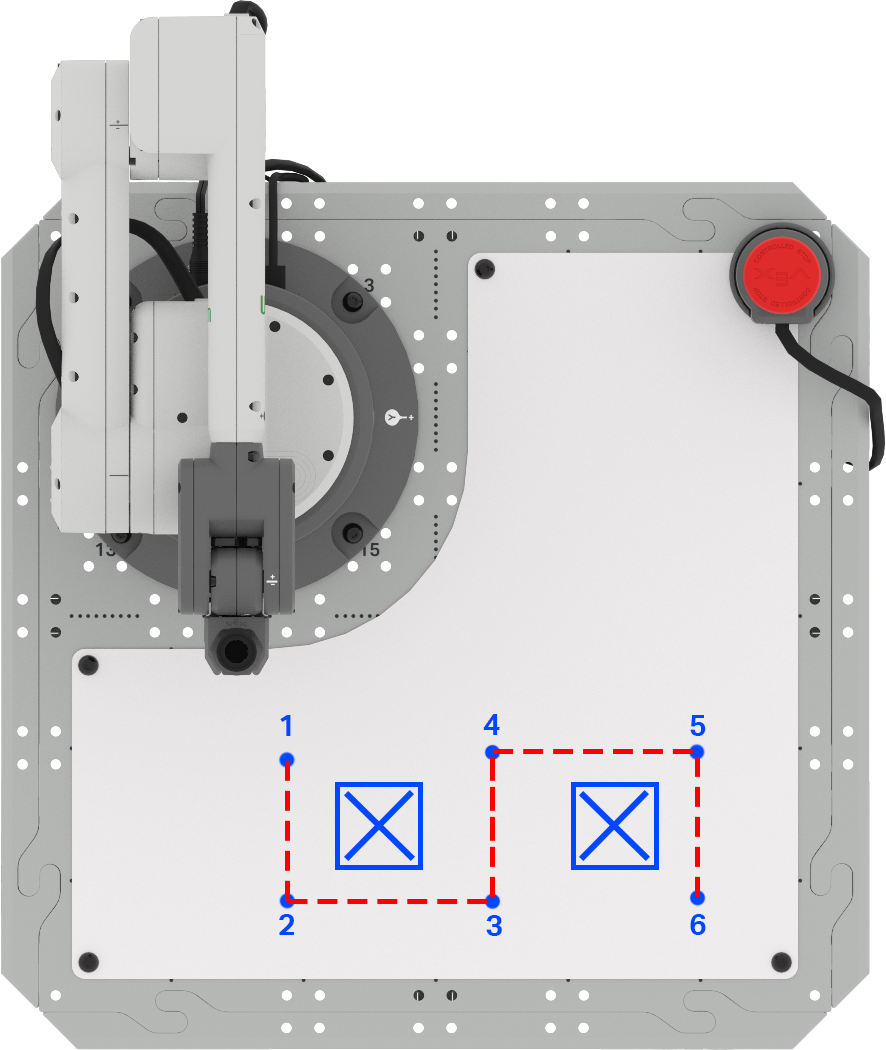
Bắt đầu bằng cách thiết lập không gian của bạn với hai khu vực "cấm vào" được đánh dấu trên Phụ kiện bảng trắng bằng bút dạ bảng trắng. Chúng có kích thước gần bằng một khối lập phương.
Phác thảo bố cục này trong sổ tay kỹ thuật của bạn.

Cánh tay 6 trục của bạn sẽ cần phải vẽ một đường thẳng để đi theo đường dẫn được cung cấp ở đây. Ghi lại lộ trình vào sổ tay kỹ thuật của bạn.

Đánh dấu mỗi điểm dừng cần thiết trên Bảng trắng của bạn. Ghi lại những điểm dừng này vào sổ tay kỹ thuật của bạn.
Ở bước tiếp theo, bạn sẽ cần xác định tọa độ (x, y, z) của từng điểm dừng. Bạn có thể thực hiện việc này bằng cách sử dụng công thức từ Bài 2 hoặc sử dụng Bảng điều khiển màn hình để thu thập từng tọa độ này.
Để bạn biết
Khi sử dụng công thức để tính toán tọa độ chưa biết của một điểm dừng, hướng mà Cánh tay 6 trục cần di chuyển dọc theo một trục là rất quan trọng. Nếu cánh tay 6 trục di chuyển theo hướng x hoặc y dương thì giá trị ∆x hoặc ∆y sẽ dương. Nếu cánh tay 6 trục di chuyển theo hướng x hoặc y âm, giá trị ∆x hoặc ∆y sẽ âm.
Ví dụ, khi di chuyển từ điểm dừng 3 đến điểm dừng 4, Cánh tay 6 trục sẽ di chuyển dọc theo trục x theo hướng âm.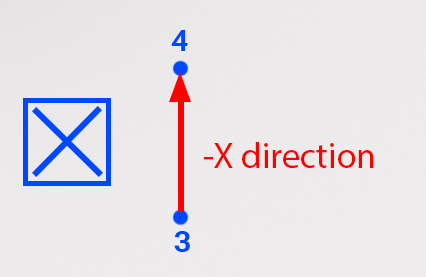
Khi sử dụng công thức, giá trị của ∆x sẽ là số âm. Trong ví dụ này, tọa độ x của điểm 3 là 195mm và khoảng cách giữa điểm 3 và điểm 4 được đo là 105mm. Sử dụng công thức, chúng ta có thể tính toán tọa độ x của điểm 4 là 90mm, như thể hiện ở đây. 
Trước đó bạn đã sử dụng Bảng điều khiển giám sát ở Đơn vị 3.
Để mở Bảng điều khiển giám sát trong VEXcode EXP, hãy chọn biểu tượng Giám sát. Đảm bảo rằng Tay 6 trục của bạn được kết nối với VEXcode EXP.

Di chuyển thủ công đầu của Cánh tay 6 trục đến từng điểm dừng và ghi lại tọa độ (x, y, z) tương ứng vào sổ tay kỹ thuật của bạn.

Bây giờ bạn đã có tọa độ cho từng điểm dừng, bạn cần chỉnh sửa dự án VEXcode từ Bài 2.
Mở dự án của bạn trong VEXcode EXP. Dự án này sẽ bao gồm các khối sau, nhưng có thể có giá trị tọa độ khác nhau.

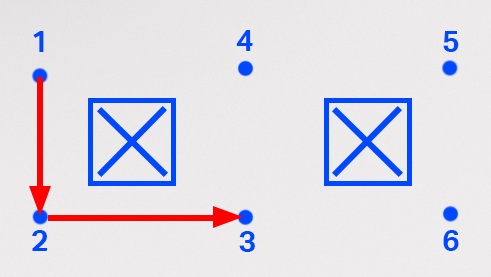
Nhập tọa độ của các điểm dừng 1, 2 và 3 vào ba khối Di chuyển đến vị trí theo thứ tự. Hãy chắc chắn sử dụng tọa độ của bạn.
Lưu ý: Bạn có thể chỉnh sửa các khối Cchú thích để phù hợp với dự án bằng cách chọn khoảng trắng và nhập.

Hãy xem các khối trong dự án. Bạn nghĩ cánh tay 6 trục sẽ làm gì khi dự án được triển khai? Ghi lại dự đoán của bạn vào sổ tay kỹ thuật.

Đảm bảo rằng Tay 6 trục được kết nối với VEXcode. Chạy dự án của bạn.
Quan sát hành vi của cánh tay 6 trục. Nó có di chuyển như bạn dự đoán không?

Dừng dự án khi cánh tay 6 trục đã chuyển động xong.
Cánh tay 6 trục sẽ di chuyển từ điểm dừng 1 đến điểm dừng 2 và kết thúc tại điểm dừng 3. Nếu không, hãy quay lại và kiểm tra tọa độ bạn đã đưa vào dự án. Hãy đảm bảo các tham số x, y và z khớp với tọa độ bạn thu thập được trong sổ tay kỹ thuật. Chạy lại dự án để kiểm tra.
Sau khi đã điều hướng thành công đến điểm dừng số 3, hãy chuyển sang bước tiếp theo.
Thêm ba khối Di chuyển đến vị trí vào chồng, do đó bạn có tổng cộng sáu khối – một khối cho mỗi điểm dừng, cũng như vị trí bắt đầu và kết thúc của bạn.

Để bạn biết
Bạn cũng có thể thêm khối bằng cách sao chép những khối đã có trong một ngăn xếp. Để sao chép, hãy mở Menu ngữ cảnh bằng cách nhấp chuột phải vào khối bạn muốn sao chép. Khi sao chép, mọi khối bên dưới khối bạn chọn sẽ được sao chép.
Trong dự án này, bạn có thể chọn khối Di chuyển đến vị trí đầu tiên để sao chép cả ba khối, tổng cộng là sáu khối. Sau khi chọn 'Nhân bản', các khối sẽ được sao chép (bao gồm cả các tham số của chúng) và bạn có thể thêm chúng vào cuối ngăn xếp.
Trong video này, các khối Bình luận và Di chuyển đến vị trí được sao chép bằng cách nhấp chuột phải để mở menu ngữ cảnh và chọn tùy chọn trên cùng, 'sao chép'. Các khối được sao chép sẽ được gắn vào phần dưới cùng của dự án. Bạn có thể chỉnh sửa các khối Bình luận trong dự án của mình để giúp dự án được tổ chức tốt hơn.
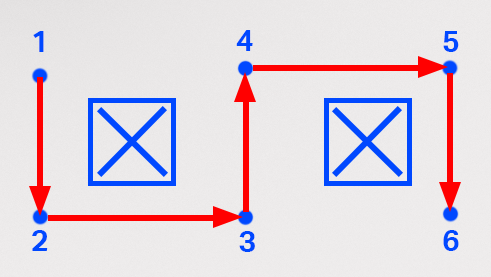
Nhập tọa độ của ba điểm dừng cuối cùng vào ba khối Di chuyển đến vị trí cuối cùng. Hãy đảm bảo nhập tọa độ từ sổ tay kỹ thuật của bạn theo thứ tự, kết thúc bằng vị trí cuối cùng.
Lưu ý rằng tọa độ của bạn sẽ khác với tọa độ hiển thị ở đây vì chúng dựa trên vị trí chính xác của chướng ngại vật và tọa độ bạn thu thập được.

Đảm bảo rằng Tay 6 trục được kết nối với VEXcode. Chạy dự án của bạn.
Quan sát hành vi của cánh tay 6 trục. Nó có di chuyển như bạn dự đoán không?

Dừng dự án khi Cánh tay 6 trục đã hoàn tất chuyển động của nó.
Cánh tay 6 trục sẽ di chuyển từ điểm dừng 1, qua các điểm dừng 2 đến 5 và kết thúc tại điểm dừng 6. Nếu không, hãy quay lại và kiểm tra tọa độ bạn đã đưa vào dự án. Hãy đảm bảo các tham số x, y và z khớp với tọa độ bạn thu thập được trong sổ tay kỹ thuật. Chạy lại dự án để kiểm tra.
Sau khi đã điều hướng thành công đến điểm định hướng số 6, hãy chuyển sang bước tiếp theo.
Đổi tên và lưu dự án vào thiết bị của bạn.

Hoạt động
Bây giờ bạn đã học cách tìm nhiều điểm dừng và mã hóa Cánh tay 6 trục để điều hướng đường đi, bạn sẽ thực hành kỹ năng này trong hoạt động này. Trong hoạt động này, bạn sẽ lập trình cho Cánh tay 6 trục để di chuyển dọc theo đường dẫn được chỉ định nhằm tránh chướng ngại vật.
- Cài đặt:
- Vẽ ba vị trí "cấm vào" trên Ngói như trong hình ảnh này.
- Đánh dấu vị trí bắt đầu và kết thúc là A và B như minh họa.

Hoạt động:
- Lập trình cho cánh tay 6 trục để di chuyển từ điểm A đến điểm B dọc theo đường dẫn như minh họa ở trên.
- Ghi lại quá trình tìm điểm dừng trong sổ tay kỹ thuật của bạn.
- Sau khi xây dựng và thử nghiệm dự án, hãy chạy nó để đảm bảo dự án hoạt động như mong đợi.
- Sau khi hoàn tất hoạt động, hãy đổi tên và lưu dự án vào thiết bị của bạn.
Kiểm tra sự hiểu biết của bạn
Trước khi chuyển sang Bài học tiếp theo, hãy đảm bảo rằng bạn hiểu các khái niệm trong Bài học này bằng cách trả lời các câu hỏi trong tài liệu bên dưới trong sổ tay kỹ thuật của bạn.
Kiểm tra câu hỏi hiểu biết của bạn > (Google Doc / .docx / .pdf)
Chọn Tiếp theo > để áp dụng các kỹ năng của bạn vào hoạt động Tổng hợp tất cả.