
In this Lesson, you will learn about computer science fundamentals including:
- What a programming language is.
- What a robot behavior is.
- How to modify robot behaviors.
At the end of this Lesson, you will apply the skills you learned to identify the behaviors of the 6-Axis Robotic Arm, such as those seen in the video below, as well as the VEXcode blocks that correspond to each behavior. In the video clip below, the 6-Axis Arm begins in the safe position, then moves to touch Tile location 32. It then moves along the Tile and pauses at Tile locations 36 and 36, at the bottom right corner of the Tile. The 6-Axis Arm then moves toward the Signal Tower, pausing at Tile location 24, and stopping on Tile location 12, beside the Signal Tower which is blinking green while the project runs.
Understanding Programming Languages
A programming language is a set of rules in which symbols represent actions. Programming languages follow step-by-step instructions that a computer executes in order for a project to run.
VEXcode is the programming language for the 6-Axis Arm.
Robot Behaviors
Behaviors are the actions performed or to be performed by a robot. Moving up and down along an axis, stopping, and turning the lights on the Signal Tower on or off — these are all behaviors. Behaviors are defined by the programming language.
To change the behaviors of the 6-Axis Arm, you can change the blocks in a project. These programming blocks are also called commands. You edited commands in the previous Lesson when you changed the color of the Signal Tower's lights in the activity.
You can find all of the blocks available to use with the 6-Axis Arm and Signal Tower in the Toolbox on the left side of VEXcode.
You can access the full list of commands by scrolling through the Toolbox, as shown in this video. In the video clip, the Toolbox is scrolled through to show the different commands available to use in a project.
For Your Information
You can learn more about any of the blocks by opening the Help. The Help explains what a block does and how to use it in a project. To open the Help window, select the Help icon, then select the block you want to learn more about, as shown in the video below. In this video clip, the question mark Help icon on the far right of VEXcode is selected, then the Help window opens. Next, the Set signal tower block in the project is selected and the Help information is shown for that block.
Modifying Robot Behaviors
Changing the blocks, or commands, in a project will change the behavior of the robot. Modifying parameters, adding, deleting or arranging blocks in a project will all modify the robot's behaviors.
Changing parameters
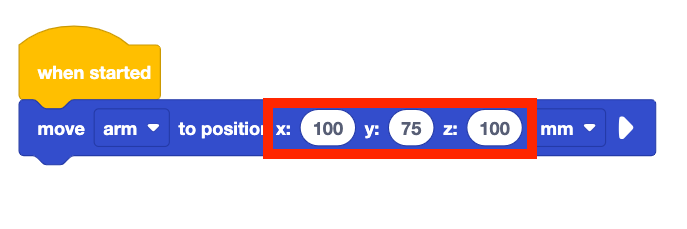
The (x, y, z) coordinates in the parameters of the Move to position block cause the behavior of moving to that particular coordinate. Modifying the parameters in the block changes the robot's behavior by moving the 6-Axis Arm to a different location.
For example, in this project, the behavior of the 6-Axis Arm is to move to the coordinate (100, 50, 100).
Changing the parameters in the block will move the 6-Axis Arm to the coordinate (150, 150, 200). That is a different behavior than the previous command, as the 6-Axis Arm moves to a different location.
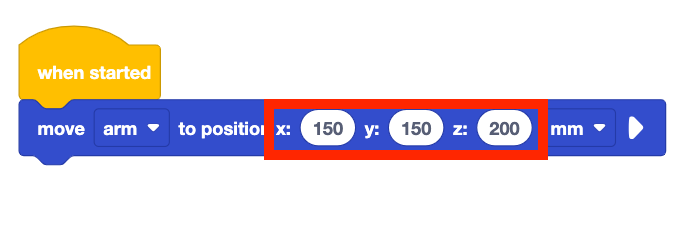
In the video below, the project shown to the right will to move the 6-Axis Arm to the coordinate (100, 75, 100) when the project is run. The 6-Axis Arm begins in the safe position, then moves to that coordinate, and the project is stopped. The parameters of the Move to position block are then changed to (150, 150, 200). When the project is run a second time, the 6-Axis Arm moves to the new location.
For Your Information
As mentioned above, commands are the programming blocks in VEXcode EXP used to control the behaviors of the 6-Axis Arm.

Parameters are the details of each command. These can include drop downs or other inputs. In the block shown here, there are many parameters. One to choose the device to connect to, one for each of the axis coordinates, and one to determine the units (millimeters or inches).

Rearranging blocks
Blocks in a stack run from top to bottom, performing each behavior in that order.
Rearranging the blocks will change the robot's behavior it performs the behaviors in a different order.
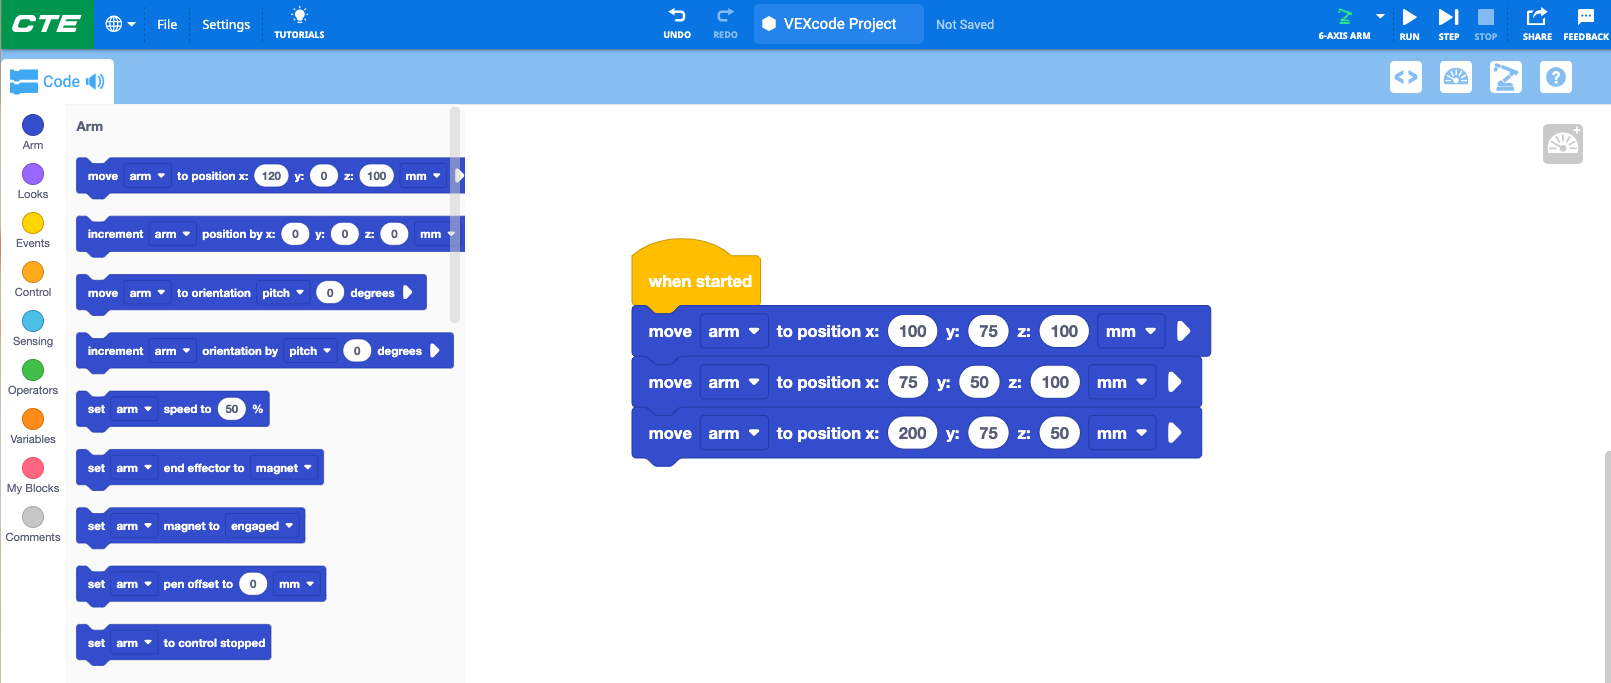
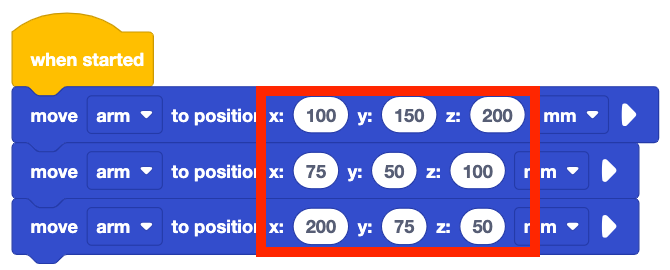
In this example, the 6-Axis Arm will move to three coordinates in a specific order:
- (100, 150, 200)
- (75, 50, 100)
- (200, 75, 50)
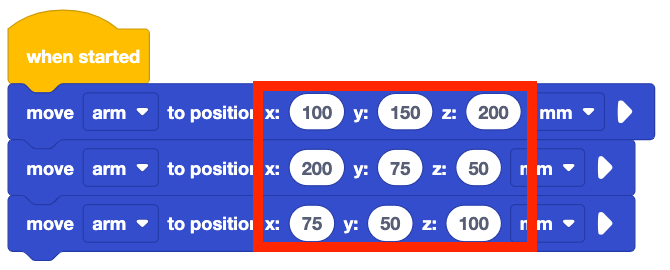
By dragging the blocks to rearrange them, the commands are then placed into a different order. The behaviors of the 6-Axis Arm will change, as it will now move to the coordinates in this order:
- (100, 150, 200)
- (200, 75, 50)
- (75, 50, 100)
In the video below, the 6-Axis Arm moves to the three coordinates in a specific order when the project is run, as shown in the project above. The project is stopped, and the blocks are then rearranged, to move the third block between the first two. When the project is run again, the 6-Axis Arm's behavior changes, as it moves to the coordinates in the new order.
Activity
Now that you have learned about robot behaviors and how behaviors relate to specific commands in VEXcode, you can practice these skills by identifying the different behaviors of the 6-Axis Arm in the video below and trying to equate them to blocks. In the video clip below, the 6-Axis Arm begins in the safe position, then moves to Tile location 32. It then moves along the bottom row of squares on the Tile to the bottom right corner, then moves upwards along the right side row of squares toward the Signal Tower.
- Begin by watching this video of the 6-Axis Arm.
- Identify all of the behaviors you see being performed by the 6-Axis Arm and Signal Tower. Record them in your engineering notebook.
- Compare your list of behaviors with your group members. What behaviors do you have that are similar or different from one another?
- Compare your list of behaviors with blocks in VEXcode. What blocks go with each behavior you identified? Record these in your engineering notebook.
Check Your Understanding
Before beginning the next Lesson, ensure that you understand the concepts in this Lesson by answering the questions in the document below in your engineering notebook.
Check Your Understanding questions > (Google Doc / .docx / .pdf)
Select Next > to learn about how to code the 6-Axis Arm to move along the x-axis.