
In the previous Lessons, you explored the x and y-axes by coding the 6-Axis Robotic Arm to move along those two axes.
In this Lesson, you will learn about the z-axis and how to code the 6-Axis Arm to move along this third axis.
By the end of this Lesson, you will be able to code the 6-Axis Arm to move along the z-axis including moving with multiple axes changing at the same time.

Introduction to the Z-Axis
In the Cartestian coordinate system, the z-axis represents vertical movement or height.
Unlike the x and y-axes, which typically correspond to horizontal movements (left-right and forward-backward), the z-axis is perpendicular to both, moving up and down as shown in this video. In an industrial setting, this vertical axis is crucial for tasks that require lifting, lowering, or reaching at different heights.
In the case of a 6-Axis Arm, the z-axis controls how high or low the arm extends. The precision in moving along the z-axis is critical for the arm to accurately reach targets, avoid obstacles, and perform delicate operations as shown in this video.
In manufacturing, robots often use the z-axis to place components on a conveyor belt, stack items, or perform assembly tasks that require vertical motion. In warehouses, robotic systems utilize the z-axis to retrieve or store items on different shelf levels.
When coding movements in VEXcode, you will need to consider the z-axis for tasks that involve lifting or lowering the 6-Axis Arm as shown in this video. This introduces an additional layer of complexity compared to movements restricted to the x and y-axes as you saw in Lessons 3 and 4.
In this video clip, the 6-Axis Arm begins in the safe position, then moves to pick up the Disk on Tile location 18. It moves down on the z-axis to engage the Disk, then lifts the Disk up along the z-axis, to move safely over the other Disks on the Tile. The 6-Axis Arm then moves over Tile location 33, and moves down on the z-axis to safely drop the Disk in its new location.
Coding the 6-Axis Arm Along the Z-Axis
The z-axis can be used similarly to how you have been coding movements along the x and y-axes in previous Lessons. Follow along with the steps below to code the 6-Axis Arm to move along the z-axis.
Open your saved project from Lesson 4. Rename the project Change z values and save it to your device.

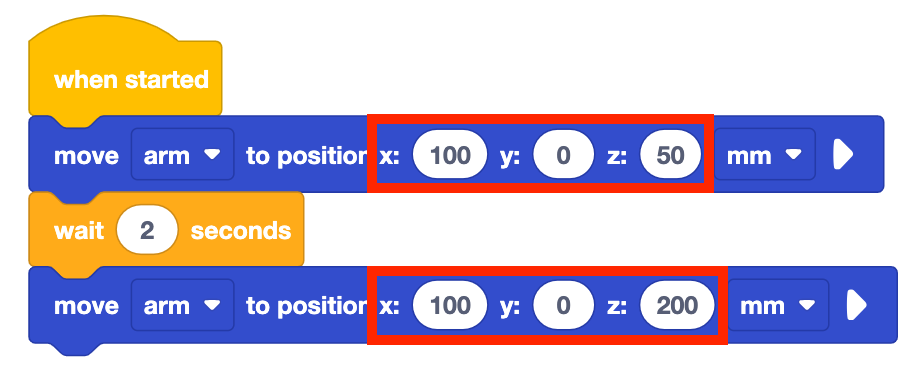
Change the values of the two Move to position blocks to the following coordinates. Remember that coordinates are written as (x, y, z).
- (100, 0, 50)
- (100, 0, 200)
What do you think this will cause the 6-Axis Arm to do? Record your prediction in your engineering notebook.
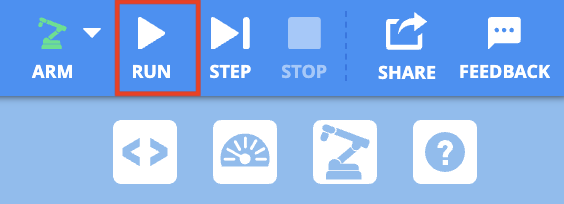
Be sure the 6-Axis Arm is connected to VEXcode. Run the project.
Observe the 6-Axis Arm as it moves along the z-axis. Notice that the 6-Axis Arm will start by moving to the Safe Position (120, 0, 100), then will execute the blocks in the project.
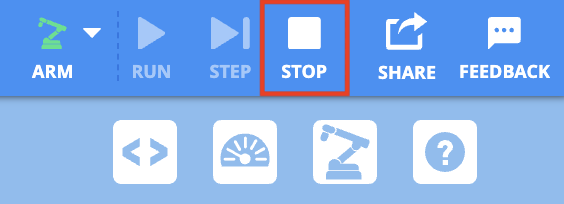
Stop the project once the 6-Axis Arm has stopped moving.
Record your observations in your engineering notebook. How did the 6-Axis Arm move in this project? Is it similar or different to your prediction? Why?
Notice that when the z-value is changed the 6-Axis Arm extends and retracts along the z-axis, as shown in this animation.
How does that compare to the movement of your 6-Axis Arm in this project?
For Your Information
You can also combine movements along multiple axes at once by inserting a (x, y, z) coordinate in the Move to position block.
In order to find the specific (x, y, z) coordinate of a location, you can use the Monitor Console in VEXcode EXP. To open the console, select the Monitor Console icon in the top right corner of the Toolbar.
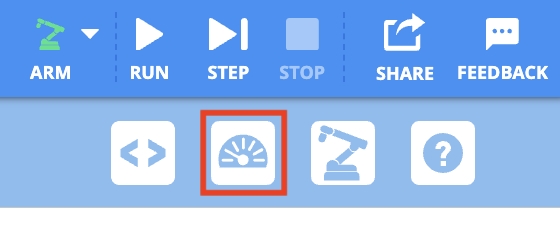
The Monitor Console will open and show you data including the current x, y, and z-values of the end effector and if the Signal Tower is being pressed. Notice that the Monitor Console values will update in real time as you manually move the 6-Axis Arm, as shown in the video below.
Activity
Now that you have learned how to code the 6-Axis Arm to move along the z-axis, you will practice these skills. In this activity, you will code the 6-Axis Arm to move along the z-axis to find the minimum and maximum z-values that the 6-Axis Arm can move to.
- Make a prediction for the minimum and maximum z-values that the 6-Axis Arm can move to. Record the predicted values in your engineering notebook.
- Using the same project from above, change the z-values in the Move to position blocks to your predicted values.
- Run your project to test your predictions. Ensure your 6-Axis Arm is connected to VEXcode.
- Continue to predict and test different z-values. Be sure to record your predictions and results in your engineering notebook when testing your projects. What minimum and maximum values do you find?
- Compare your results to other groups' values. Are they similar or different? Which group has the largest and smallest values? Test those values and adjust your results if needed.
Check Your Understanding
Before beginning the next Lesson, ensure that you understand the concepts in this Lesson by answering the questions in the document below in your engineering notebook.
Check Your Understanding questions > (Google Doc / .docx / .pdf)
Select Next > to combine your skills in the Putting It All Together activity.