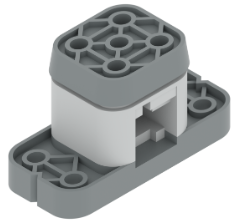
The VEX IQ Bumper Switch
![]() Teacher Toolbox
-
The Purpose of this Section
Teacher Toolbox
-
The Purpose of this Section
The Play section of this STEM Lab is intended to introduce students to all five of the VEX IQ Super Kit's sensors (Bumper Switch, Touch LED, Distance Sensor, Gyro Sensor, and Color Sensor). The Teacher Toolbox at the bottom of each lesson/page can help you to troubleshoot each sensor.
On the student-side, each lesson in this section begins with a reading from the VEX Library about the sensor, how it works, and how it can be used to improve a robot/project. The reading can be completed independently or the entire class can read it together. Here is a general sequence common to all lessons*:
-
Read about the sensor and its functionality.
-
Recreate, using the Testbed template example project, a brief provided project that highlights some aspect(s) of the functionality of the sensor.
-
Test the project to gain experience in how the sensor's data is used in programming.
-
Answer questions, in engineering notebooks, about the sensor as explained in the reading or about the test of the sensor's brief project.
*The only exception within the Play section is that the Color Sensor lesson asks students to build, test, and answer questions about two projects: one related to near object detection and color readings, and the other related to brightness readings and line tracking. So it will likely require more time than the other sensor lessons.
![]() Teacher Toolbox
-
Newest Version
Teacher Toolbox
-
Newest Version
Ensure you are using the latest version of the VEXcode IQ software (version 1.0.4 or later). This version includes the Sense It Challenge example project that will be needed in the Rethink Challenge. If you do not have the latest version of the software, click here to download it.
![]() Teacher Toolbox
-
Student Group Roles
Teacher Toolbox
-
Student Group Roles
For suggestions on grouping students together for this activity, click one of the following links (Google Doc/.docx/.pdf).
The VEX IQ Super Kit contains five different sensors that can be used with the VEX IQ Brain. All five are built into the Testbed you previously built in the Seek section of this STEM Lab.
The Play section of the lab will explain how each sensor works and how it can be used in the design of a robot. The table below lists everything you will need to complete the Play section of this lab.
| Quantity | Materials Needed |
|---|---|
| 1 |
VEX IQ Testbed (with up-to-date firmware) |
| 1 |
VEXcode IQ |
| 1 |
Engineering Notebook |
| 1 |
Testbed Template example project |
| 1 |
Roll of black or dark tape |
| 1 |
Clear, light-colored surface |
Read about the Bumper Switch
To learn more about the Bumper Switch, ask the Reader to organize how the group will read the VEX IQ Bumper Switch article from the VEX Library. This article will cover how the Bumper Switch works as provide common uses.

Program with the Bumper Switch
Have the Programmer open VEXcode IQ and follow these steps:
-
Begin by opening the Testbed template example project from VEXcode IQ.

- For help opening the example project, view the Use Example Projects and Templates tutorial video.
-
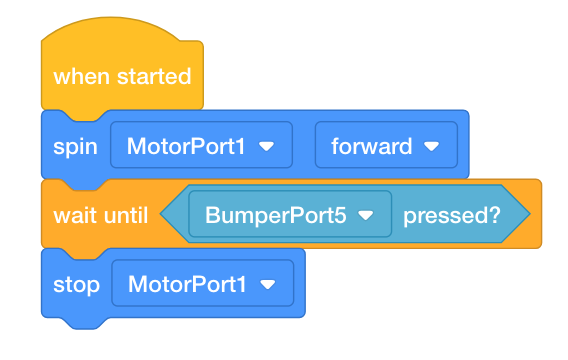
Build the following project and save it (macOS, Windows, Chromebook, iPad) as Bumper Switch:

You can use the Help information inside of VEXcode IQ to learn about the blocks. For guidance in using the Help feature, see the Using Help tutorial.

![]() Teacher Tips
Teacher Tips
If this is the student's first time using VEXcode IQ, they can also see the Tutorials in the toolbar to learn other basic skills.

Test the Bumper Switch
Have the Tester connect the VEX IQ Brain to your computer and then follow these steps:
-
Download the project to the IQ Robot Brain.
-
Run the project to press the Bumper Switch to stop the Motor from spinning in Port 1.
-
For help downloading and running a project, view the Download and Run a Project tutorial video.
-
Based on your observations of how the sensor behaved on the Testbed and the information from the reading, answer the following questions and ask the Recorder to document them in your engineering notebook:
-
What is the value of the Bumper Switch when the motor is spinning?
-
What is the value of the Bumper Switch when it is pressed?
-
![]() Teacher Toolbox
-
Answers
Teacher Toolbox
-
Answers
-
The value of the Bumper Switch is 0 (released) when the motor is spinning.
-
The value of the Bumper Switch is 1 (pressed) when it is being pressed.
![]() Teacher Toolbox
-
Troubleshooting
Teacher Toolbox
-
Troubleshooting
When working with the Bumper Switch, there could be instances where it does not behave as it should. If this occurs, begin troubleshooting by trying the following steps:
-
First begin by checking that the Bumper Switch's firmware is up-to-date. Read this article for more information on how to update firmware.
-
If the firmware is up to date, further look into the Device Info screen on the IQ Brain to check that “pressed” and “released” states register on the Brain. For other more general issues, there is an article, “How to Troubleshoot VEX IQ Sensors.”
-
If the Device Info reports accurate values, the issue could be that the student miscopied the project.
-
To troubleshoot the project, check that the device is configured properly - meaning that they used the correct Testbed example project. For more information on how to configure the Touch LED, read the "How to Configure VEX IQ Sensors - VEXcode IQ" article.
-
Ensure that the students copied and built the project correctly. You can use the print block in VEXcode IQ to display the current sensor values on the Brain as the project proceeds through to the error or to the end of the project.
-
-
If the Device Info does NOT report accurate values, then the issue could be hardware-related.
-
To troubleshoot the hardware, try checking the port connection with the Smart Cable using the article, “How to Connect VEX IQ Devices to Smart Ports.”
-
If the Bumper Switch is connected properly and it is still not behaving as it should, there could be a physical issue with the Bumper Switch. Test switching it out with another Bumper Switch.
-
![]() Motivate Discussion
Motivate Discussion
To help students understand how a bumper can be helpful to a robot, ask the following questions:
Q: What might happen to a robot if it doesn't have a bumper sensor and runs into a wall?
A: The robot could become damaged because it didn't know to stop moving forward once it reached the wall.
Q: Imagine you are walking around a room in the dark. What part of your body might you compare to the bumper switch to? Why?
A: Many responses will be acceptable, but examples could be fingers, hands, or feet. In the dark, we know when we run into an object or wall by touching it, and this might be fingers or hands as we reach out in front of us, or feet as we take a step. Note students could answer with any part of the body because all skin relays touch information.